Sunday, January 28, 2007

Customizing Asp.Net 2.0 application to look like a SharePoint 2007 Portal : Approach 2

As we saw in my previous blog , one of the simpler approach to achieve the “Consistent UI” in Asp.Net application when they are run together with SharePoint portal .


Now we will check out the second approach where we have the same “Financial Application” and we have following requirements:


  • The UI of the existing application must be similar to existing portal

  • The Application must be executed under the same context of SharePoint portal

In order to achieve these we need to perform following:


Consistent UI :
In order to achieve the same UI as of portal, we have to use the “Master Page “of the portal. Inherit all the .aspx page of your existing application from Master page of portal.

SharePoint portal Context:
In order to run the portal under SharePoint context, copy the complete application folder to “C:\Program Files\Common Files\Microsoft Shared\web server extensions\12\TEMPLATE\LAYOUTS”

Let’s convert our existing “Financial Application “in order to adhere to the above mentioned requirement.


Step 1: Getting application to SharePoint Context


Copy the complete application folder of the “Financial Application” to


“C:\Program Files\Common Files\Microsoft Shared\web server

extensions\12\TEMPLATE\LAYOUTS”
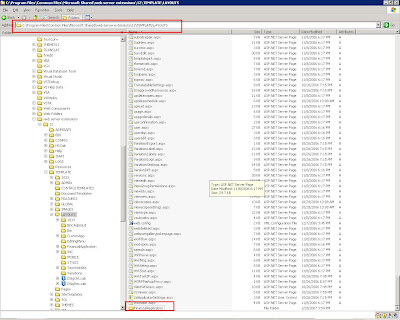


Now we can access the same application under context of SharePoint portal, use the following URL

http://localhost/_layouts/financialapplication/default.aspx and we get the following page:
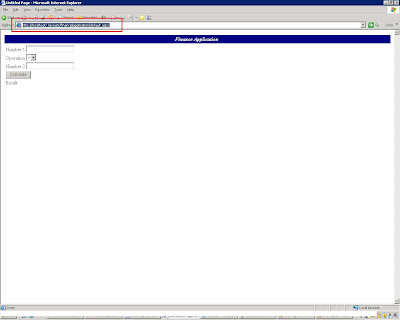


As we achieved one step of getting our application to the SharePoint context, our next step is to achieve SharePoint UI:


Step 2: Setting application UI to that of SharePoint


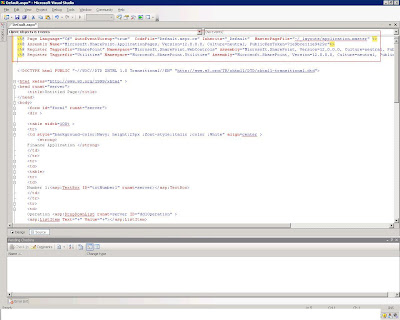
As mentioned above we can achieve the SharePoint UI by simply inheriting the master page of our portal. In order to achieve this lets open your “default.aspx” of “Financial Application “in Visual Studio 2005/Notepad.


In the page directive of “default.aspx “page add attribute:

MasterPageFile="~/_layouts/application.master" and add following directives:

  • <@ Assembly Name="Microsoft.SharePoint.ApplicationPages, Version=12.0.0.0, Culture=neutral, PublicKeyToken=71e9bce111e9429c"%>;

  • <@ Register Tagprefix="SharePoint" Namespace="Microsoft.SharePoint.WebControls" Assembly="Microsoft.SharePoint, Version=12.0.0.0, Culture=neutral, PublicKeyToken=71e9bce111e9429c" >;

  • <@ Register Tagprefix="Utilities" Namespace="Microsoft.SharePoint.Utilities" Assembly="Microsoft.SharePoint, Version=12.0.0.0, Culture=neutral, PublicKeyToken=71e9bce111e9429c" >;

The page would be like this:


Once we are done with the master page reference we need to define the content of the page. As Master pages contains content placeholders we need to place complete “Form” section of our application to the appropriate content placeholder of the default.aspx. Lets define a content placeholder element in “default.aspx” page:


<asp:Content ID="Content1" ContentPlaceHolderId="PlaceHolderMain" runat="server">asp:Content>

Lets copy the complete form elements from our default.aspx and add it to the ContentPlaceholder named “PlaceHolderMain”. Copy all elements of <form> tag as shown below:
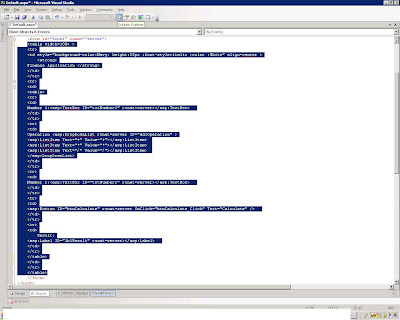


And paste it inside the content placeholder.”Default.aspx” now looks like:
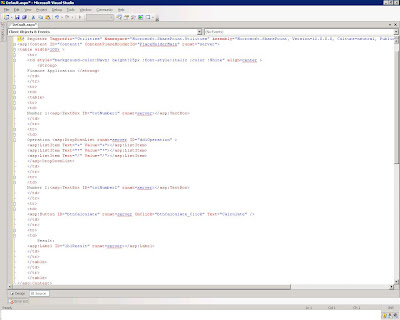


Let’s define the Title too using the ContentPlaceHolder “PlaceHolderPageTitleInTitleArea”


Add the following in “default.aspx” for defining title:

<asp:Content ID="Content2" ContentPlaceHolderId="PlaceHolderPageTitleInTitleArea" runat="server">Financial Application<asp:Content>

It seems we are done. Now when we try the same url http://localhost/_layouts/financialapplication/default.aspx

We get the page with SharePoint UI as shown below:


That’s it, 30 min of effort and your application seems to be a SharePoint application and now you can go forward and use the SharePoint context to achieve any tweaking with the SharePoint portal . You can get the code for Changed "Financial Application" from

http://www.box.net/index.php?rm=box_v2_download_shared_file&file_id=f_40004506

Saturday, January 27, 2007

Customizing Asp.Net 2.0 application to look like a SharePoint 2007 Portal: Approach 1

In any organization you can find plethora of application implemented, which are dependent /independent of each other. When such organization decided to move the portal way then the “AIM “ is to provide one “Window” for information for complete organization .This can be achieved by integrating the existing application with the portal application .In such case one important rule while implementing portal is to maintain “Consistent UI” across organization portal . The “consistent UI “site receives better acceptability by the end user. I got this requirement and wanted to share the simplicity of achieving this in SharePoint 2007 portal.

For showcasing this I have taken a web application which is a virtual “Financial application” for an organization .We will go forward and give this application “MASK OF SHAREPOINT”, doing that we achieve the important principal of portal acceptability “CONSISTENT UI”. There are number of approach which can be implemented to achieve. We will see both the case.

Let’s see how our application looks before we start our makeover:


As we see our application is a plain app which does basic computation.


First Approach:


In case we have independent application and just need a share point MASK in such case we can use “Page Viewer web part” .In Order to implement this , create a new SharePoint page in your SharePoint site .Site Actions->Create Page.


Name : Finance Application


URL : financeapplication
Page Layout: Blank Web Part Page


Press “Create”, you will get the page as shown below:


Click on “Add New Web Part” and select “Page Viewer Web Part” from the list.


Click “open the tool pane” in the web part to specify the finance application URL, and click apply.


You will get the “Finance Application“ page inside the “Page Viewer web part”, you might get the frame as the “Page Viewer Web part “ width and height is by default set to fit the web part zone .Feel free to modify the dimension of page viewer web part . Result page looks like:


This approach can be used in following situations:


  • When the application is completely independent and don’t need any information from the portal site i.e. it’s not required to run the Asp.Net application in context of the portal application

Second Approach:


This approach is advantageous when the application needs to “Run in the same context of SharePoint portal “


e.g.

  • Developing SharePoint administration custom page


We will see this approach in the next blog ;-). BREAK

Saturday, January 20, 2007

Hiding SharePoint 2007 List Context Menu Items


Am sure lot's of people would be wondering how to hide menu items of a list eg document libraries "Send to " menu item .


In olden days of SharePoint 2003 this used to be achieved using playing around with the OWS.jss file ,though the customization is same in SharePoint 2007 too but the file has been changed . Now the modifications needs to be done in CORE.JS file located at "C:\Program Files\Common Files\Microsoft Shared\web server extensions\12\TEMPLATE\LAYOUTS\1033\CORE.JS"


Let's change the file and see the difference , In order to hide menu item e.g "Send to " search for function named "AddSendSubMenu()" in CORE.JS and comment the function call . as shown in figure below:


That's it check the menu in doc lib now , does it looks like mine:-)


NOTE: Make sure you take back up of Core.js file before making any change in order to prevent any server functionality malfunction.

Thursday, January 18, 2007

Error Loading workflow Visual Studio 2005


Have you ever faced this issue and wondering what's wrong with the editor.Well in my case the sharepoint references were missing .

Monday, January 15, 2007

Automate back Up Process MOSS 2007

I hope it's a pain for all the SharePoint geeks to get the back up of there site manually either using Sharepoint administration/Sharepoint designer/stsadm.exe tool .

I was thiking about it and wanted to make my life simpler so thought of writing a tool to automate the process and here it is .

This tool is very basic and only limited to complete backup . Granular level backup is not supported .I haven't taken care of all the cases so tool might fail in certain condition.So there is possibility that the back up might fail and you might get "Success" message . well sounds scary :) .Just make sure you check the back up atleast first time .

I have included a word file with configuration info .Also included the complete 15 liner class file in case you want to make it more stable.

This is a normal command tool and needs to be run with windows scheduler.

Tool is available at :
Download

Saturday, January 06, 2007

Registering Event Handler for list events

To register event handler for list events , create folder in the \template\features folder named "EventFeature" which contain a feature.xml file that specifies the scope and ID of the "feature" and element .xml file that the former file references.The feature file might look like the following :


< Feature>
< Scope="Web"
Title="Event handler"
Id="Create a GUID"
xmlns="http://schemas.microsoft.com/sharepoint/" >
< ElementManifests >
< ElementManifest location="element.xml" >
< /ElementManifests>
< /Feature>

The element.xml file registers the event handler assembly and associates it with a list type, for announcement list type is 104 as shown below:


< Elements >
< Receivers
< ListTemplateOwners="name of site definition using which this site is created and this list belongs to "
ListTemplateId="104" >
< Receiver >
< Name >EventHandler< /Name >
< Type >2< /Type >
< SequenceNumber >10000< /SequenceNumber >
< Assembly > "NameSpace name of assembly"
,version=1.0.0.0,Culture=neutral,PublicKeyToken="public key token of assembly"
< /Assembly >
< /Class >"ClassNameOfAssembly"< /Class >
< Data >< /Data >
< Filter >< /Filter >
< /Receiver >
< /Receivers >
< /Elements >

Once we are done with feature creation ,register feature using stsadm.exe tool present in "C:\Program Files\Common Files\Microsoft Shared\web server extensions\12\BIN"

Run the following command to install feature :
stsadm -o installfeature -filename EventFeature\feature.xml

Run the follwing command to activate the feature:
stsadm -o activatefeature -filename EventFeature\feature.xml -url "url of the site"

That's it you are done with features ...just go forward and try adding ,deleting,editing in list and check weather it performs as per your expectations .

ENJOY!!! LIFE IS MUCH SIMPLER NOW :-)

Thursday, January 04, 2007

List Events in Windows SharePoint Services 3.0

Ever had these questions while working with lists/document library:
  • Is it possible to restrict users from entering invalid data?
  • Is it possible to have counters for files created ,deleted?
  • Is it possible to display users with "Custom Error" in case they try entering invalid data?
All these questions were kind of un-answered during days of SharePoint 2003 ,fortunately days have changed and Microsoft has solutions for it .Its the MOSS 2007/WSS 3.0 Events.

In WSS 3.0 events that are triggered by list allow you to hook up with code when the list itsms are added,changed or removed.
Events are divided in 2 category :
  • Events that fire before an action occurs :This allow you to perform custom validation or processing of data that is about to be added to the list,modified or deleted.
  • Events that fire after a certain action occurs
In WSS 3.0 it is possible to communicate responses back to the user interface.

You can create an event handler assembly using Visual Studio .NET by creating a class inhering from SPItemEventReceiver base class present in Microsoft.SharePoint.dll assembly.

using System;
using Microsoft.SharePoint;

namespace WSS.FirstTest
{
public class MyFirstEventhandler:SPItemEventHandler
{
}
}


This class will be instantiated by the WSS 3.0 when action occurs within the list. In order to define custom behaviour of these events we need to override the methods in SPItemEventReceiver class. Following method can be overriden:
  • ItemAdding
  • ItemAdded
  • ItemUpdating
  • ItemUpdated
  • ItemDeleting
  • ItemDeleted
  • ItemCheckingIn
  • ItemCheckedIn
  • ItemCheckingOut
  • ItemCheckedOut
  • ItemUncheckingOut
  • ItemUncheckedOut
  • ItemFileRenaming
  • ItemFileRenamed
  • ItemAttachmentAdding
  • ItemAttachmentAdded
  • ItemAttachmentDeleting
  • ItemAttachmentDeleted
We will override method ItemDeleting as sample.

public override void ItemDeleting(SPItemEventProperties property)
{
if(property.BeforeProperties["Amount"].ToString() >"500")
{
property.Cancel=true;
property.ErrorMessage ="Any amout greater than 500 cannot be deleted" ;
}
}

In this case when user tries to delete any item whose Amount is greater than 500 gets an error message .

Now as we have done with the Event assembly the next task is to register the assembly.In my next Blog we can check out the registering of events to a list.

Gray Failures: What is it and how to detect one?

If you are reading this article , i guess you are curious to know about gray failures and different methods to detect gray failures.  Hopefu...